Just a quick note to say that all going well, I'll be moving my blog fairly soon. I have my own webspace (thejuggler.net) and have had for many years. The provider has meany features that I've never really used before but I'm trying to start taking advantage of them. One of those things is that they have Wordpress running so, I'm going to shift things over there.
The new address will be puzzling-parts.thejuggler.net and I'll make this a link as soon as things are good to go.
Tuesday, April 5, 2011
Tuesday, March 29, 2011
Everyone loves Cake.
This time I have a review of the four Karakuri Cake Boxes, 1 through 4. I picked these up from PuzzleBoxWorld.Com a family run business specialising in puzzle boxes.
I am already a member of the KaraKuri Club, however these were at a good price, and I can't really say no to adding new puzzle boxes to my collection.
Each box is an inch wide by 2 inches long, so none of these are big boxes, and by Japanese measurements would be considered as 2 sun boxes.
In general all the boxes are superbly made, and each has it's own unique opening mechanism, making all of them worth having. None of them are difficult to open, requiring no more than 3 moves, so I had each of them open in less than a minute. If you like this style of puzzle, then I'd say they're worth picking up, but don't expect them to challenge you.
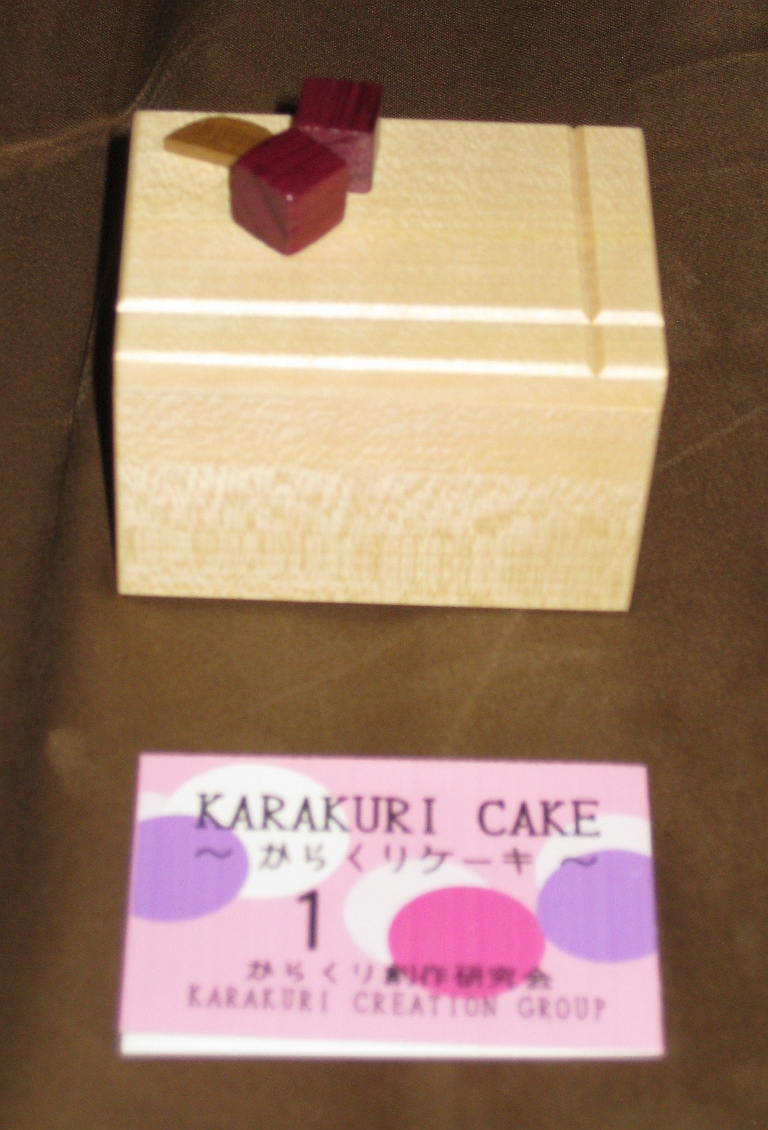
The first box entitled "Cheese Cake" is what I would consider the most 'standard' of the boxes to open. It follows the usual pattern of sliding end panels, and is fun for it's design more than it's solution.

The second in the series entitled "Fruit Cake", and it's easy to see why, is a little unconventional. At first, the lid will move a millimetre and no more. There seems to be nothing else which moves, and it leaves you wondering. After a short time exploring, you'll come across the solution. It's not a standard puzzle box, but does follow a fairly simple locking mechanism that is well enough hidden to keep people guessing.
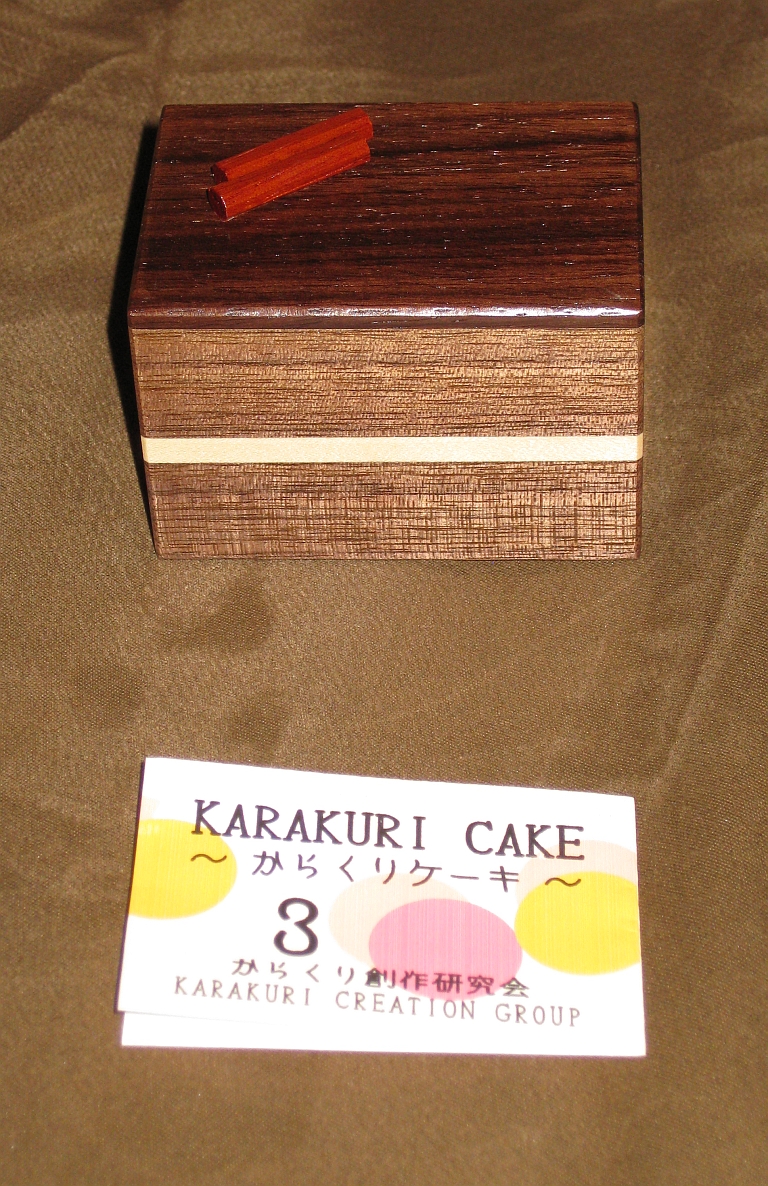
Number three in the series is entitled "Chocolate Cake", and judging by the dark brown wood used, it would be a fairly rich cake at that. No huge surprises here, it's pretty standard and won't pose any real challenge to someone familiar with puzzle boxes. Again more fun for its looks than the challenge.
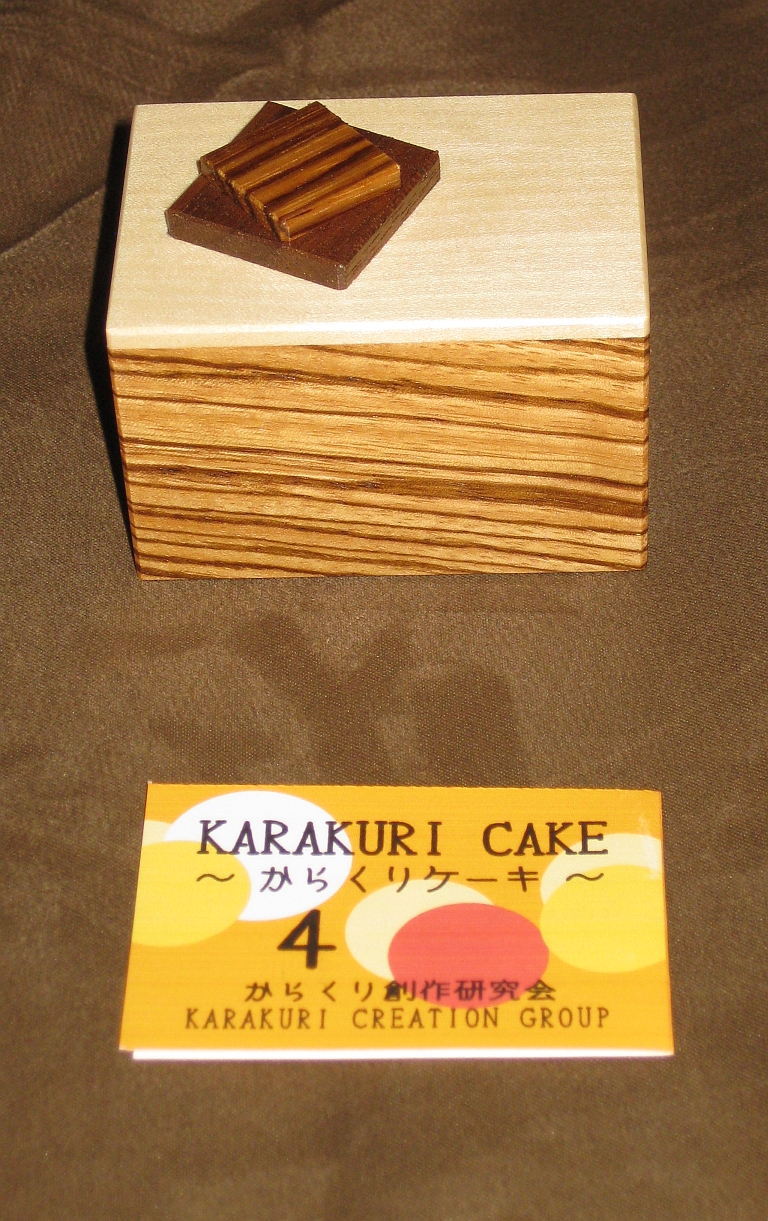
Finally we have "Marble Cake". The Zebra wood used in this box giving it it's distinctive look. This one had me stumped for the longest time. When you've been looking for and finding sliding panels, to find that none of the panels on this box move at all tends to throw you off the solution. I think this is my favourite of the four just because of the mechanism used. If you were only to buy one, I'd make it this one.
I am already a member of the KaraKuri Club, however these were at a good price, and I can't really say no to adding new puzzle boxes to my collection.
Each box is an inch wide by 2 inches long, so none of these are big boxes, and by Japanese measurements would be considered as 2 sun boxes.
In general all the boxes are superbly made, and each has it's own unique opening mechanism, making all of them worth having. None of them are difficult to open, requiring no more than 3 moves, so I had each of them open in less than a minute. If you like this style of puzzle, then I'd say they're worth picking up, but don't expect them to challenge you.

The first box entitled "Cheese Cake" is what I would consider the most 'standard' of the boxes to open. It follows the usual pattern of sliding end panels, and is fun for it's design more than it's solution.

The second in the series entitled "Fruit Cake", and it's easy to see why, is a little unconventional. At first, the lid will move a millimetre and no more. There seems to be nothing else which moves, and it leaves you wondering. After a short time exploring, you'll come across the solution. It's not a standard puzzle box, but does follow a fairly simple locking mechanism that is well enough hidden to keep people guessing.

Number three in the series is entitled "Chocolate Cake", and judging by the dark brown wood used, it would be a fairly rich cake at that. No huge surprises here, it's pretty standard and won't pose any real challenge to someone familiar with puzzle boxes. Again more fun for its looks than the challenge.

Finally we have "Marble Cake". The Zebra wood used in this box giving it it's distinctive look. This one had me stumped for the longest time. When you've been looking for and finding sliding panels, to find that none of the panels on this box move at all tends to throw you off the solution. I think this is my favourite of the four just because of the mechanism used. If you were only to buy one, I'd make it this one.
Monday, March 28, 2011
Vinco Cross Box
So little has changed with the state of my own puzzle, with many other jobs needing done, I've not had the time to work on it. However here's a review of Vinco's Cross box instead.
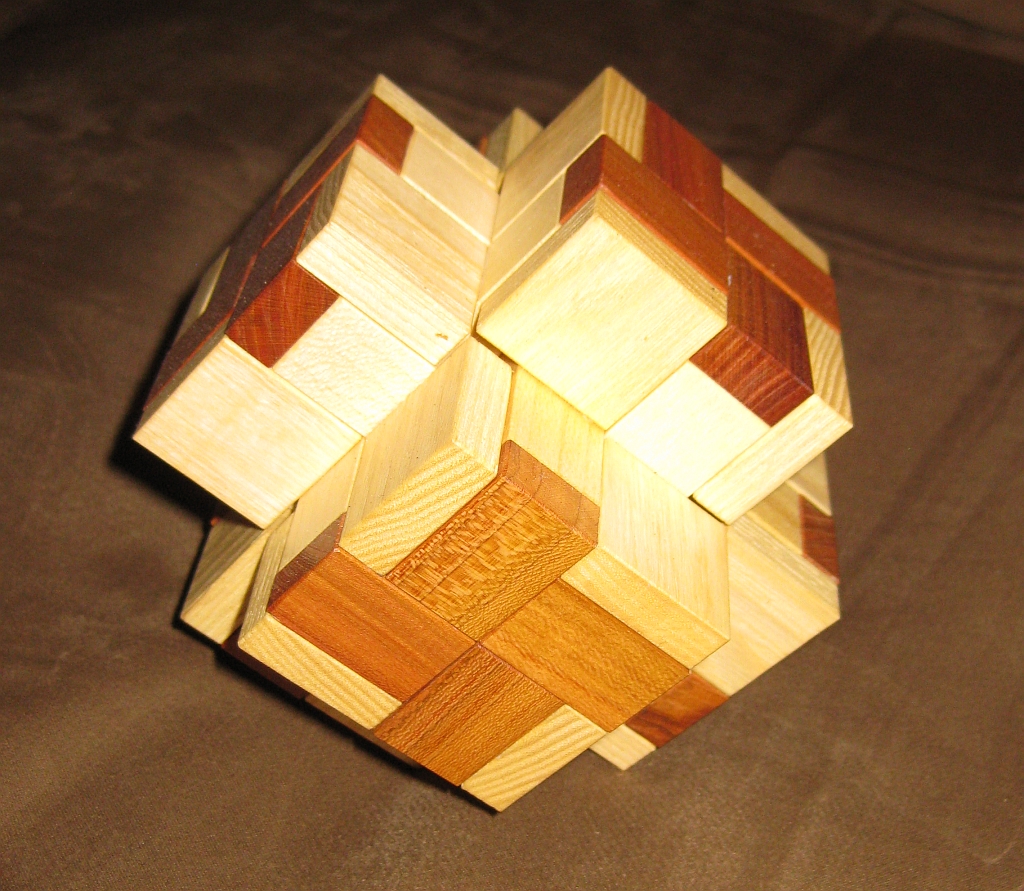
If you're not familiar with Vinco, these are mostly wooden puzzles made by Vaclav Obsivac, who is generally regarded as the master of coordinate motion puzzles. As you can see from the photograph, the work is superb. These are beautifully made wooden puzzles, which for the most part are composites of many different woods glued together to make the puzzles. One of the things that I hear most often about these puzzles is that people think they must be very expensive. The craftsmanship is excellent, and they carry an air of quality about them. The truth is that they are not that expensive, with each piece being less than $50 on average.
Cross Box, is made from six identical pieces which require a coordinate motion to assemble and disassemble. When I first got this puzzle, it was very tight. The finish used had left the pieces very slightly tacky, and to take it apart, I had to get my fingers inside the puzzle, and pull with significant force. After it was taken apart once, the motion is much smoother, and it now almost explodes when you slide the pieces apart.
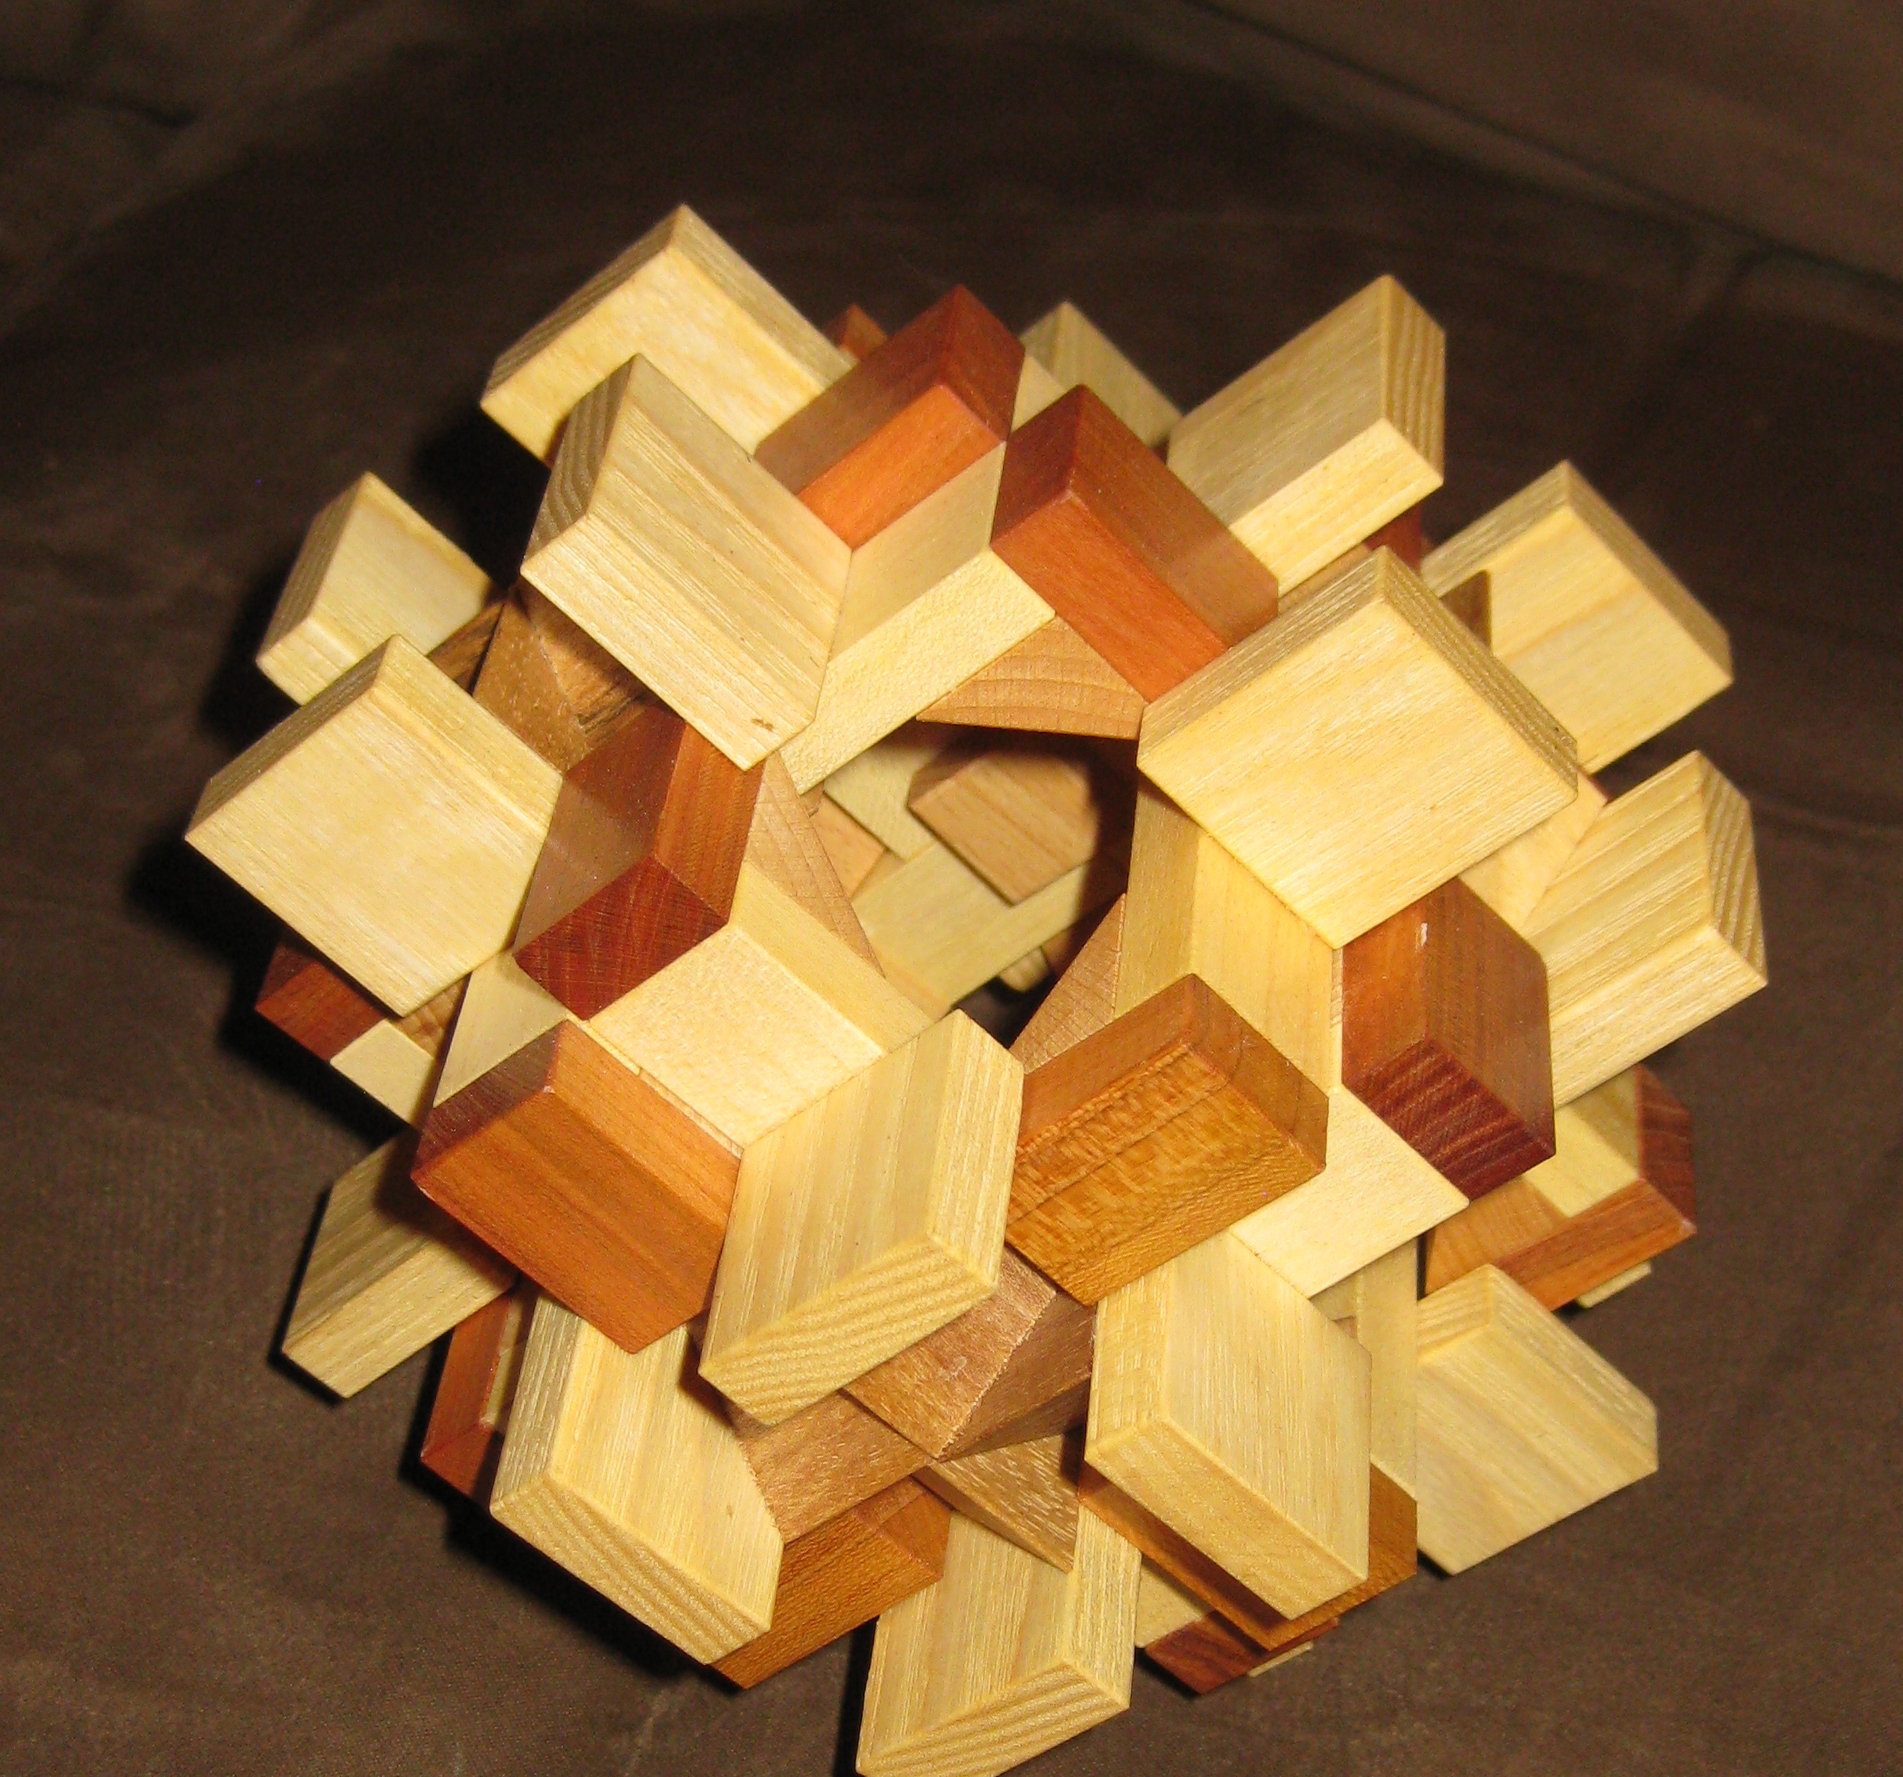
As you can see, when the puzzle starts to come apart, it increases significantly in size. Each piece sliding against four others to create the puzzle. This isn't particularly difficult to put together, and only took me a few minutes. The shape is fairly stable with a couple of the sides in place, and it makes it possible to work without needing a jig or rubber bands to hold everything in place as you put it back together.
Overall, I really like this piece. It's a great show piece, and when you take it apart, people seem quite amazed at just how much bigger it becomes. Well worth adding this or any other Vinco to your collection.
I bought this from PuzzleMaster who carry a selection of Vinco's puzzles.

If you're not familiar with Vinco, these are mostly wooden puzzles made by Vaclav Obsivac, who is generally regarded as the master of coordinate motion puzzles. As you can see from the photograph, the work is superb. These are beautifully made wooden puzzles, which for the most part are composites of many different woods glued together to make the puzzles. One of the things that I hear most often about these puzzles is that people think they must be very expensive. The craftsmanship is excellent, and they carry an air of quality about them. The truth is that they are not that expensive, with each piece being less than $50 on average.
Cross Box, is made from six identical pieces which require a coordinate motion to assemble and disassemble. When I first got this puzzle, it was very tight. The finish used had left the pieces very slightly tacky, and to take it apart, I had to get my fingers inside the puzzle, and pull with significant force. After it was taken apart once, the motion is much smoother, and it now almost explodes when you slide the pieces apart.

As you can see, when the puzzle starts to come apart, it increases significantly in size. Each piece sliding against four others to create the puzzle. This isn't particularly difficult to put together, and only took me a few minutes. The shape is fairly stable with a couple of the sides in place, and it makes it possible to work without needing a jig or rubber bands to hold everything in place as you put it back together.
Overall, I really like this piece. It's a great show piece, and when you take it apart, people seem quite amazed at just how much bigger it becomes. Well worth adding this or any other Vinco to your collection.
I bought this from PuzzleMaster who carry a selection of Vinco's puzzles.
Friday, March 25, 2011
Some New Puzzles
This is the first puzzle review I've done here, as I've not made any real progress on my own puzzle, so I thought I should throw something up about the three Karakuri Christmas boxes I was lucky enough to get.
For those not familiar with the Karakuri group, they are a set of master puzzle designers in Japan who create exquisite puzzle boxes. Of all their work I have seen, from the simplest and cheapest of their works, to the most complex, all are superbly handmade from some beautiful woods, and will look superb in any collection.
I was lucky enough in the post Christmas lottery to get all three of the boxes I was looking for. They are "The Magic Hat" from Shiro Tajima; RL and Snake Cube from Hideaki Kawashima.
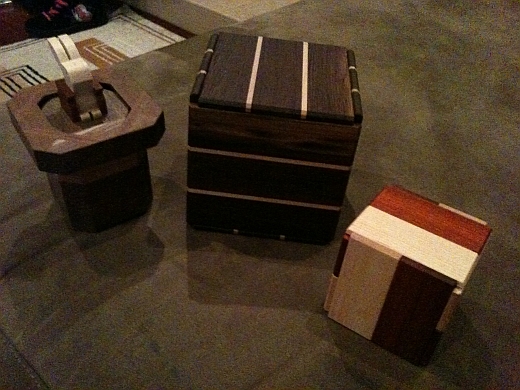
All three boxes arrived inside their own cardboard box, and sealed in plastic inside that box. It may seem strange but all three of these boxes are fairly large for puzzle boxes. RL is the largest at 7" cubed.
After opening these, I played briefly with each, but couldn't open any of them. With the exception of the Magic Hat, the others had a standard sliding panel mechanism, however they didn't open obviously.

RL was the first I opened, and it has a rather nice mechanism. Without giving anything away, there is a dual mechanism here that may throw some people off, making this more interesting to give to your friends to try. It took around 10 minutes for me to open this box, and it opens in 3 moves, so not a complex box by any stretch however it is a very pleasing box with a good internal space. I also think there may be a second compartment in this box, so I will play with it more to see if that is the case. The contrasting woods used here with the dark main panels, and the light stripes gives the box a very strong presence. Mr Kawashima even added a note to say that with age, the dark wood will continue to darken which is nice, so you don't think anything is wrong with the puzzle. As someone who is working with wood, I know this and it's entirely natural, however not everyone may know that this could happen.
My box has a couple of lighter areas in the dark wood, which is probably a result of the piece of wood being used having been covered where the rest was exposed to light. You can see this in the picture, both on the top panel to the right and the top of the front panel. I have no issue with this, and it will darken within a short time, but it may upset some people as they may feel it detracts from the look. Personally, it's wood, I love that it's not a ferfectly uniform colour.
As a slight aside, Purpleheart which is a vibrant purple when first cut, will become a darker brown with age, so although a lot of puzzle designers and wood workers like it for it's bright purple colour, it is work remembering that it's not going to stay that way.
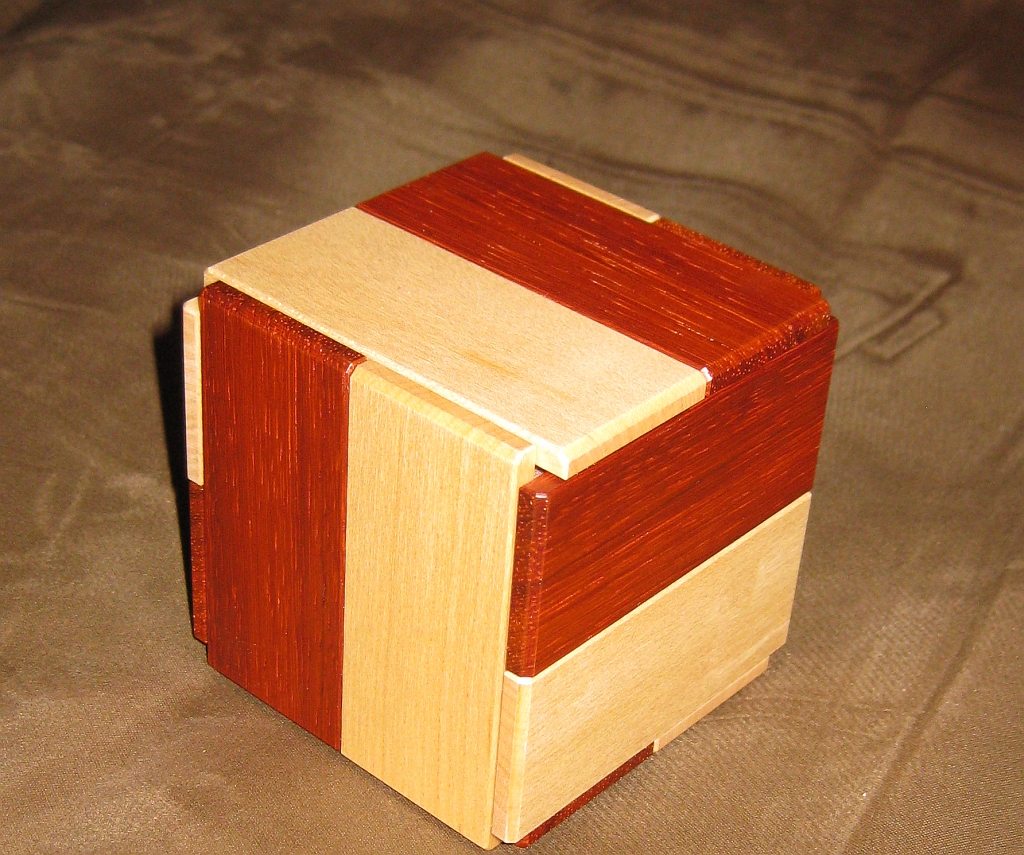
The Snake Cube was the second cube I managed to open however it really should have been the first. It has a fairly standard sequential sliding panel mechanism, however the final move caught me out. I expected the panels to continue to slide, however once the lock mechanism is released, the lid lifts off. It's very well seated so doesn't fall off, and you can move the box around quite easily without discovering this (as I did for about 10 mins). On my third attempt (and after having opened the RL box) I opened this since the final step is the same. The contrasting red and light woods used on this box give it a really pleasing look, and it's a nice piece to display. I feel all the works from Karakuri fall into that category though.
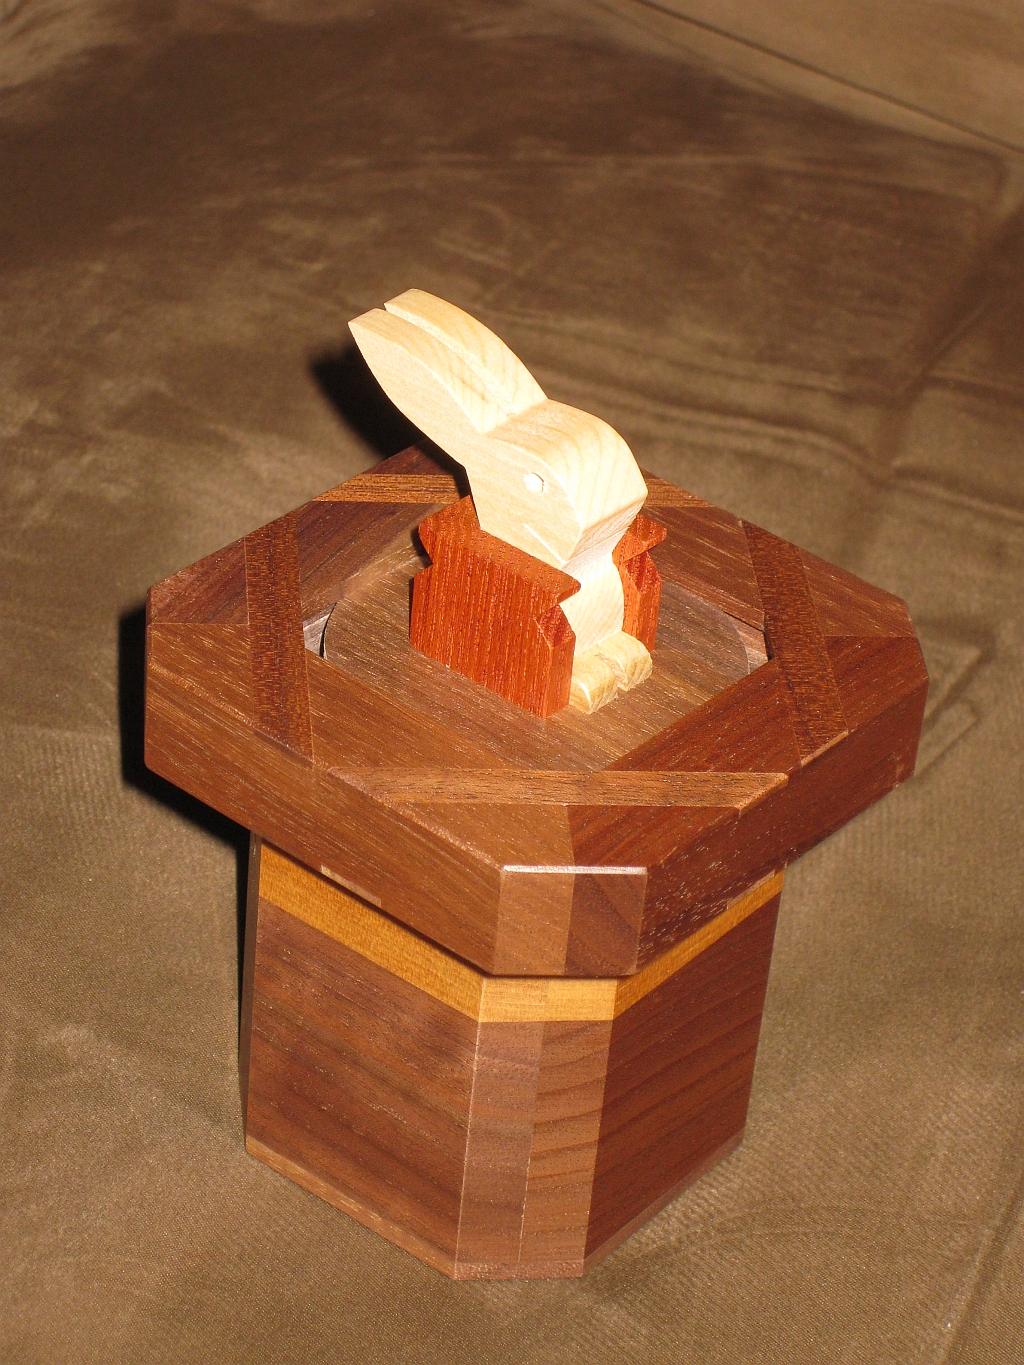
The final box I opened was the Magic Hat. This is a beautiful box, that seems to have no obvious way to open it. The Rabbit on the top is attached to a circular piece of wood under the lip of the hat rim, and will spin freely. Nothing else seems to move, and spinning the rabbit just makes him (or you) dizzy. I did eventually figure out how to open this box, after around 30 minutes, and was treated to a wonderful detail inside the box. The mechanism is remarkably simple, which I think adds to the effect when you finally open it. Of the three this is probably my favourite, as it has the best fun factor, and will be a piece that people want to pick up when they see it.
For those not familiar with the Karakuri group, they are a set of master puzzle designers in Japan who create exquisite puzzle boxes. Of all their work I have seen, from the simplest and cheapest of their works, to the most complex, all are superbly handmade from some beautiful woods, and will look superb in any collection.
I was lucky enough in the post Christmas lottery to get all three of the boxes I was looking for. They are "The Magic Hat" from Shiro Tajima; RL and Snake Cube from Hideaki Kawashima.

All three boxes arrived inside their own cardboard box, and sealed in plastic inside that box. It may seem strange but all three of these boxes are fairly large for puzzle boxes. RL is the largest at 7" cubed.
After opening these, I played briefly with each, but couldn't open any of them. With the exception of the Magic Hat, the others had a standard sliding panel mechanism, however they didn't open obviously.

RL was the first I opened, and it has a rather nice mechanism. Without giving anything away, there is a dual mechanism here that may throw some people off, making this more interesting to give to your friends to try. It took around 10 minutes for me to open this box, and it opens in 3 moves, so not a complex box by any stretch however it is a very pleasing box with a good internal space. I also think there may be a second compartment in this box, so I will play with it more to see if that is the case. The contrasting woods used here with the dark main panels, and the light stripes gives the box a very strong presence. Mr Kawashima even added a note to say that with age, the dark wood will continue to darken which is nice, so you don't think anything is wrong with the puzzle. As someone who is working with wood, I know this and it's entirely natural, however not everyone may know that this could happen.
My box has a couple of lighter areas in the dark wood, which is probably a result of the piece of wood being used having been covered where the rest was exposed to light. You can see this in the picture, both on the top panel to the right and the top of the front panel. I have no issue with this, and it will darken within a short time, but it may upset some people as they may feel it detracts from the look. Personally, it's wood, I love that it's not a ferfectly uniform colour.
As a slight aside, Purpleheart which is a vibrant purple when first cut, will become a darker brown with age, so although a lot of puzzle designers and wood workers like it for it's bright purple colour, it is work remembering that it's not going to stay that way.

The Snake Cube was the second cube I managed to open however it really should have been the first. It has a fairly standard sequential sliding panel mechanism, however the final move caught me out. I expected the panels to continue to slide, however once the lock mechanism is released, the lid lifts off. It's very well seated so doesn't fall off, and you can move the box around quite easily without discovering this (as I did for about 10 mins). On my third attempt (and after having opened the RL box) I opened this since the final step is the same. The contrasting red and light woods used on this box give it a really pleasing look, and it's a nice piece to display. I feel all the works from Karakuri fall into that category though.

The final box I opened was the Magic Hat. This is a beautiful box, that seems to have no obvious way to open it. The Rabbit on the top is attached to a circular piece of wood under the lip of the hat rim, and will spin freely. Nothing else seems to move, and spinning the rabbit just makes him (or you) dizzy. I did eventually figure out how to open this box, after around 30 minutes, and was treated to a wonderful detail inside the box. The mechanism is remarkably simple, which I think adds to the effect when you finally open it. Of the three this is probably my favourite, as it has the best fun factor, and will be a piece that people want to pick up when they see it.
Monday, March 21, 2011
Did I mention wood?
So a little while back I mentioned that the next step for the puzzle project was to create the puzzle in wood. Lego is great for the first prototype and to check that things are working as expected, but without glue, it's not holding together as well as I'd like.
So with my tools at the ready, I set out to create my first wooden puzzle!
Initially, I did use the band saw to cut out one of the pieces for the burr puzzle I designed, but on reflection I found that there were two things that aren't ideal. I currently have 3" x 3" cubes of Douglas Fir. The wood looks great finished, but working with it, I've found a few issues. The end grain is very hard. That means that cutting the wood isn't easy. It seems that the band saw goes through it rather quickly in one 'ring' then the next ring the blade has to work a lot harder. That means that cutting the detailed shapes I need isn't easy. The other problem is that I still need practice!
So I decided to go with a simpler basic 3 piece burr to get some practice working with the wood, and also to get practice until I can find a better wood to work with than the Douglas fir I have just now.
Sorry for the bad picture. I took this quickly with my phone, and really need to take a better picture, but at least you can see the result.
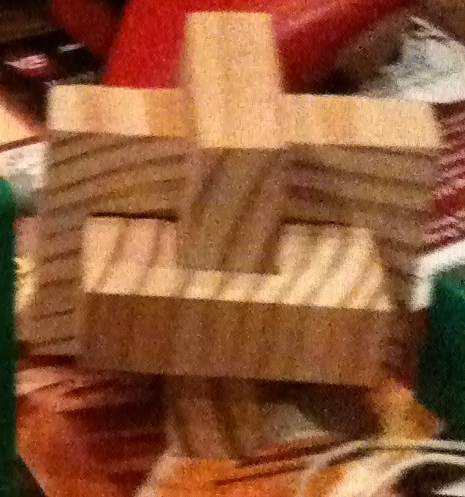
Overall, it's not a bad first attempt. The pieces are snug, and the gaps between them aren't too bad. I'm not going to win any awards, and I'm certainly not going to be selling it any time soon, but I'm happy enough as a start.
Next step is getting back to the main project and putting the puzzle together. Unfortunately, that has taken a back seat as I've had another woodworking project to take care of, which is building some raised vegetable beds for our yard. Still should be able to get back to things in the next few days.
So with my tools at the ready, I set out to create my first wooden puzzle!
Initially, I did use the band saw to cut out one of the pieces for the burr puzzle I designed, but on reflection I found that there were two things that aren't ideal. I currently have 3" x 3" cubes of Douglas Fir. The wood looks great finished, but working with it, I've found a few issues. The end grain is very hard. That means that cutting the wood isn't easy. It seems that the band saw goes through it rather quickly in one 'ring' then the next ring the blade has to work a lot harder. That means that cutting the detailed shapes I need isn't easy. The other problem is that I still need practice!
So I decided to go with a simpler basic 3 piece burr to get some practice working with the wood, and also to get practice until I can find a better wood to work with than the Douglas fir I have just now.
Sorry for the bad picture. I took this quickly with my phone, and really need to take a better picture, but at least you can see the result.

Overall, it's not a bad first attempt. The pieces are snug, and the gaps between them aren't too bad. I'm not going to win any awards, and I'm certainly not going to be selling it any time soon, but I'm happy enough as a start.
Next step is getting back to the main project and putting the puzzle together. Unfortunately, that has taken a back seat as I've had another woodworking project to take care of, which is building some raised vegetable beds for our yard. Still should be able to get back to things in the next few days.
Monday, March 7, 2011
So you want to build a burr
I've had a request sent to me about making puzzles from Lego, so I thought rather than reply to the person individually, I'd throw something up here, so that everyone can benefit.
I already commented in a previous post that LiveCube was a possibly way to create Burr puzzles, however as I already mentioned, they are not as easily available, and from what I have been told, when you add shipping from the US it's a rather expensive way to go.
Given this, I was asked what Bricks and plates you'd need to be able to create Burr puzzles from Lego. This post is my attempt to answer that.
I should say, that there are many ways to go about creating a burr piece. There are a lot of Lego designers out there who are far better than I am, however at it's simplest, the process is fairly easy.
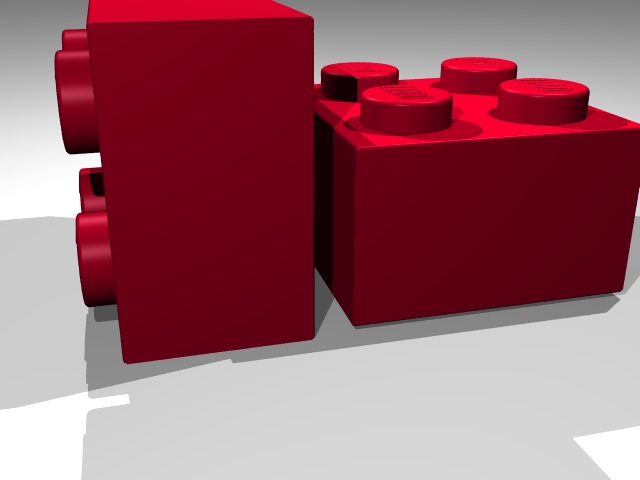
The first problem we have to overcome is that a brick is not a cube, as you can see here.
So to make it square, we need to add a couple of plates. Now the type of plate we add depends on whether the piece is going to form part of the Burr body, or the top of the Burr. For an 'internal' piece, we use a standard plate. For the top we use a 'tile with groove'. The images below show the two pieces we will use.

Now that we have the basic pieces, how do we make a cube? Well the dimensions of a lego brick 'cube' are 5x5x3. Each stud on a Lego brick represents 2.5 units. Each plate is 1 unit high. So to get a cube, we need one brick and two plates.
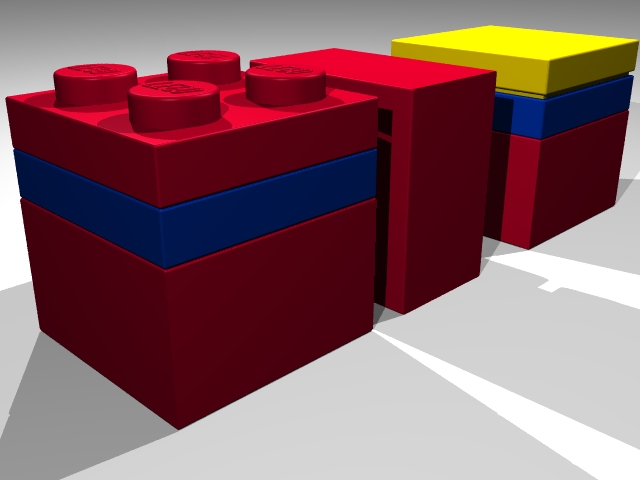
So as you can see, the height now matches the width, and we have a cube. Building up Burr pieces is fairly simple from this point. Take the piece you want to build, and using those dimensions, create the part in Lego. Having longer bricks and plates does help to make the whole thing more stable, as long as you remember that each brick requires 2 plates to make it square then you'll be fine. Of course, if you think about the height of 2 bricks, that's 10 units. You can make that from 3 bricks and 1 plate or 2 bricks and 4 plates, or 10 plates.
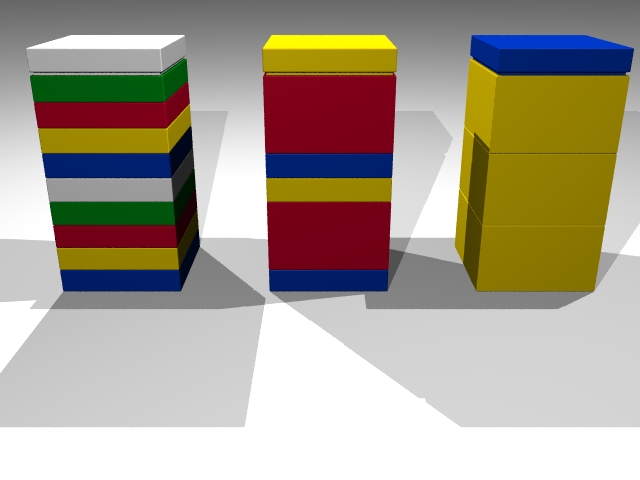
The skill comes in working out how to get the tiles in the right place so that you have smooth surfaces on the top of each Burr piece. Equally, the piece made from 3 bricks and one tile has far less pieces, and by definition less joins, so should be more stable. That's not always true however , as the thin plates have a greater surface area per thickness, so don't 'bend' as easily!
The example below shows a basic Burr piece made from Lego.
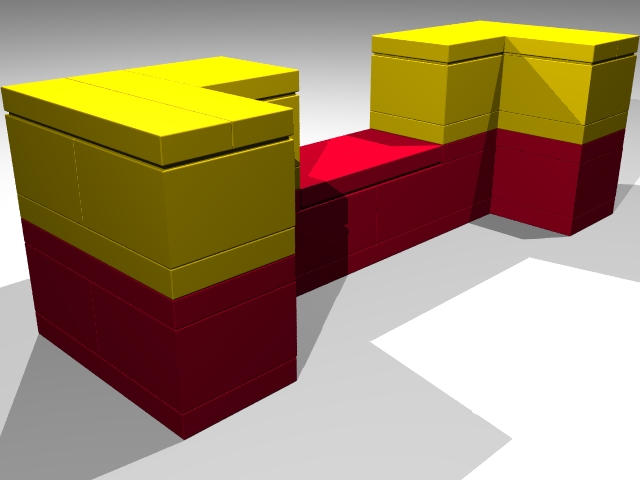
Each 'layer' is in a separate colour so that it is easier to see the height of the piece. Creating this piece is left as an exercise for the reader, however the parts used are:
4 - 2x2 brick (part #3003)
2 - 2x4 brick (part #3001)
2 - 2x6 brick (part #2456)
4 - 2x2 plate (part #3022)
6 - 2x4 plate (part #3020)
1 - 2x8 plate (part #3034)
6 - 1x4 tile (part #2431)
2 - 2x2 tile (part #3068b)
So that covers the basic burr parts. What happens when we need a half sized wall? Well it's fairly simple, we just use a 1x2 brick and plates. The part above is modified to give a more complex piece just to show the difference.
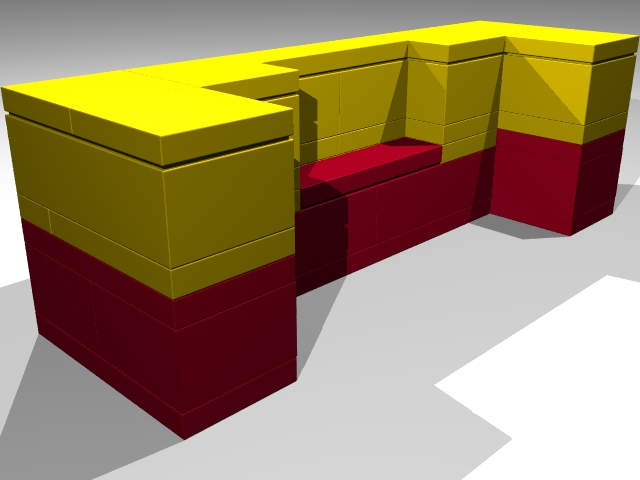
So from that you should have the basics. I highly recommend getting LDraw, there's a link under Puzzle Creation tools, and also a GUI designer such as MLCad for Windows or Bricksmith for Mac. There a good tutorials on using these on the LDraw website. The tools will help you to build the pieces ahead of time, and work out how best to build each piece. It can make things quicker, depending on how familiar you are with building in Lego. If I'm honest, most of the time, I build it in Lego first, and come back to LDraw later!
I already commented in a previous post that LiveCube was a possibly way to create Burr puzzles, however as I already mentioned, they are not as easily available, and from what I have been told, when you add shipping from the US it's a rather expensive way to go.
Given this, I was asked what Bricks and plates you'd need to be able to create Burr puzzles from Lego. This post is my attempt to answer that.
I should say, that there are many ways to go about creating a burr piece. There are a lot of Lego designers out there who are far better than I am, however at it's simplest, the process is fairly easy.
The first problem we have to overcome is that a brick is not a cube, as you can see here.

So to make it square, we need to add a couple of plates. Now the type of plate we add depends on whether the piece is going to form part of the Burr body, or the top of the Burr. For an 'internal' piece, we use a standard plate. For the top we use a 'tile with groove'. The images below show the two pieces we will use.

Now that we have the basic pieces, how do we make a cube? Well the dimensions of a lego brick 'cube' are 5x5x3. Each stud on a Lego brick represents 2.5 units. Each plate is 1 unit high. So to get a cube, we need one brick and two plates.

So as you can see, the height now matches the width, and we have a cube. Building up Burr pieces is fairly simple from this point. Take the piece you want to build, and using those dimensions, create the part in Lego. Having longer bricks and plates does help to make the whole thing more stable, as long as you remember that each brick requires 2 plates to make it square then you'll be fine. Of course, if you think about the height of 2 bricks, that's 10 units. You can make that from 3 bricks and 1 plate or 2 bricks and 4 plates, or 10 plates.

The skill comes in working out how to get the tiles in the right place so that you have smooth surfaces on the top of each Burr piece. Equally, the piece made from 3 bricks and one tile has far less pieces, and by definition less joins, so should be more stable. That's not always true however , as the thin plates have a greater surface area per thickness, so don't 'bend' as easily!
The example below shows a basic Burr piece made from Lego.

Each 'layer' is in a separate colour so that it is easier to see the height of the piece. Creating this piece is left as an exercise for the reader, however the parts used are:
4 - 2x2 brick (part #3003)
2 - 2x4 brick (part #3001)
2 - 2x6 brick (part #2456)
4 - 2x2 plate (part #3022)
6 - 2x4 plate (part #3020)
1 - 2x8 plate (part #3034)
6 - 1x4 tile (part #2431)
2 - 2x2 tile (part #3068b)
So that covers the basic burr parts. What happens when we need a half sized wall? Well it's fairly simple, we just use a 1x2 brick and plates. The part above is modified to give a more complex piece just to show the difference.

So from that you should have the basics. I highly recommend getting LDraw, there's a link under Puzzle Creation tools, and also a GUI designer such as MLCad for Windows or Bricksmith for Mac. There a good tutorials on using these on the LDraw website. The tools will help you to build the pieces ahead of time, and work out how best to build each piece. It can make things quicker, depending on how familiar you are with building in Lego. If I'm honest, most of the time, I build it in Lego first, and come back to LDraw later!
Friday, March 4, 2011
Tools for the Job
So now that I'm starting to transfer the design I have from Lego into wood, it probably makes sense to talk about tools.
I'll freely admit that I'm not a professional woodworker. Far from it. I just enjoy playing around, and I'm still very much at the bottom of the learning curve. That said, I've had a few successful projects and I'm slowly working from the simpler to the more complex creations that I want.
So first up, I have a host of hand tools, including various saws, block planes and chisels. I may not be an expert in using all of them, however I manage to do what I need with the limited experience I have. I also have a small hand held Dremel with some router attachments and various cutting/sanding/etching bits that I can play with. The two larger machines I have to play with are my 9" Band Saw and a Drill Press.
When it comes to getting clean repeatable cuts the band saw is indispensable. It also allows me to create fairly complex cuts and curves so I can do some interesting and fairly intricate work if I need to. Best of all, if I cam trying to cut down some of the larger pieces of wood to the size needed for whatever puzzle I'm working on, the band saw makes it quick and easy to do.
Thursday, March 3, 2011
Trial and Error
Previously I had completed the prototype and after a little trial and error refined things to a point where I was happy with the results and had glued everything together.

So I was happy, but was it a good puzzle? This is where I turned to my puzzling friends and gave them the puzzle in its solved, locked form. I should probably say something about the locking mechanism. As I described in my original post, I had two ideas for how to 'lock' the cube once it was put together and prevent the sides from falling out. My initial design is a simpler version which uses a free floating internal component to 'lock' the last side in place. It's a simple mechanism which uses the puzzle orientation to lock or free the last side.
So having the puzzle completed, and the lock in place, I gave it to a friend to try. I had spoken with him as I was creating the puzzle, so he knew the basic idea, but not much more. When he came back, he hadn't fully opened the puzzle, as he wasn't sure whether I wanted him to or not. What was interesting was that by half opening the first side, it allowed the internal lock to move to a different location in the puzzle. So you could think of that as a flaw, however it was interesting as it changed the way the first piece was removed. Interesting and unintended, but shows how things don't always behave the way you intended.
The feedback from my friend on the puzzle was positive, and most people who have seen it really like the Lego 'pattern' on the outside faces. So I'm happy, and now I'm left with the decision to move the prototype to wood.
I am excited to do this, as it allows me to take the first design and make it truly robust, but also it will allow me to make version two, with the rotational lock and have two versions of the puzzle, by replacing a couple of sides. That's a fun idea for me as it means I can modify the puzzle while the external look would be identical.
Next step, pencils and rulers at the ready to get started in wood.
Wednesday, March 2, 2011
Holding it together
Having put all the pieces of the puzzle together, the next task was to play with it. I wanted something that provided a challenge, but was also solvable. No sense in having something that is too difficult, or has issues with the mechanism. My first attempt to put things together, I didn't use the locking mechanism I had designed. I wanted to see that things went together and had a good feel to it.
In putting the puzzle together for the first time, I realised fairly quickly that some of the longer pieces I had created were less than solid when made from Lego. My older Lego bricks do much better than newer bricks. It seems that the newer Lego is made from a softer plastic and doesn't hold together as well. Remember as a kid using your teeth to separate bricks? Well that's not a problem on new bricks!
With a little bit of care, I was able to put the puzzle together , and it did form the cube I had intended. I will be honest though, I wasn't entirely happy with the result. There were a couple of the sides which I felt weren't as good as they should have been now that I could see them and watch how they interacted, so I played around, and redesigned two sides to make things work better.
On my second attempt, I had the same issue as the first time, that the Lego really doesn't hold together too well. I'm sure I could have made the pieces larger to get more stability from the Lego, but I didn't want a puzzle that was too large. As it stands, the puzzle is about 4.5" cubed. It's a nice size to work with, and doesn't use every single brick I have lying in my spares box to make it.
So with a little care and a careful hand (along with a jig I made out of blocks to support the pieces as I moved them into position in the solution) I got the cube together. This time I was much happier with the fit, and the way the puzzle pieces interacted with each other. There is a good amount of sliding the pieces together as they interact with each other, preventing a simple push together solution.
The image below shows part of the internals of the cube as I put it together. Each of the pieces here has to be slid into place, and the moved up/down etc to reach its final place in the cube. For someone not familiar with this sort of puzzle, it could be a challenge to see how things will fit in the solved cube.
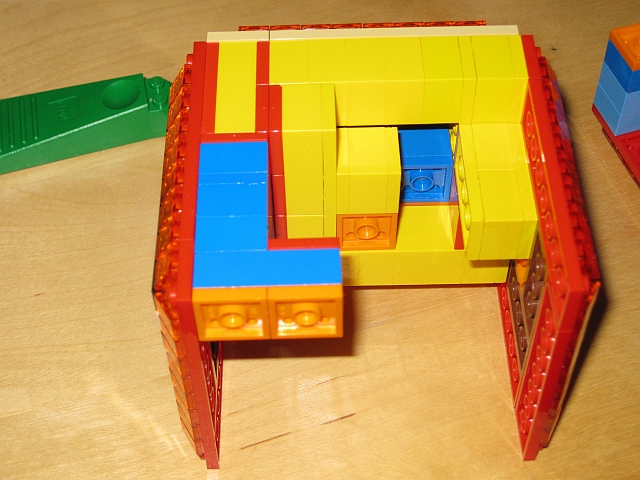
At this point I was fairly happy, but there was no way anyone else could 'play' with the cube. It was too fragile, and the pieces came apart under their own weight, not to mention with someone tugging on them. At this point, there was little other option but to glue the bricks together. So with some suitable glue in hand, and my diagrams beside me to make sure things went back together correctly, I disassembled, glued and re-assembled the sides before leaving things to dry overnight.
Coming back in the morning, the pieces were solid and I could put a good amount of force on the previously weak points without any breaks or problems in the pieces. In an ideal world I would rather not have had to glue things, but at least Lego is cheaper than the Livecubes, and also easier to get, so not a huge loss.
With the prototype complete, time to give it to someone to test ...
In putting the puzzle together for the first time, I realised fairly quickly that some of the longer pieces I had created were less than solid when made from Lego. My older Lego bricks do much better than newer bricks. It seems that the newer Lego is made from a softer plastic and doesn't hold together as well. Remember as a kid using your teeth to separate bricks? Well that's not a problem on new bricks!
With a little bit of care, I was able to put the puzzle together , and it did form the cube I had intended. I will be honest though, I wasn't entirely happy with the result. There were a couple of the sides which I felt weren't as good as they should have been now that I could see them and watch how they interacted, so I played around, and redesigned two sides to make things work better.
On my second attempt, I had the same issue as the first time, that the Lego really doesn't hold together too well. I'm sure I could have made the pieces larger to get more stability from the Lego, but I didn't want a puzzle that was too large. As it stands, the puzzle is about 4.5" cubed. It's a nice size to work with, and doesn't use every single brick I have lying in my spares box to make it.
So with a little care and a careful hand (along with a jig I made out of blocks to support the pieces as I moved them into position in the solution) I got the cube together. This time I was much happier with the fit, and the way the puzzle pieces interacted with each other. There is a good amount of sliding the pieces together as they interact with each other, preventing a simple push together solution.
The image below shows part of the internals of the cube as I put it together. Each of the pieces here has to be slid into place, and the moved up/down etc to reach its final place in the cube. For someone not familiar with this sort of puzzle, it could be a challenge to see how things will fit in the solved cube.

At this point I was fairly happy, but there was no way anyone else could 'play' with the cube. It was too fragile, and the pieces came apart under their own weight, not to mention with someone tugging on them. At this point, there was little other option but to glue the bricks together. So with some suitable glue in hand, and my diagrams beside me to make sure things went back together correctly, I disassembled, glued and re-assembled the sides before leaving things to dry overnight.
Coming back in the morning, the pieces were solid and I could put a good amount of force on the previously weak points without any breaks or problems in the pieces. In an ideal world I would rather not have had to glue things, but at least Lego is cheaper than the Livecubes, and also easier to get, so not a huge loss.
With the prototype complete, time to give it to someone to test ...
Tuesday, March 1, 2011
Building a Prototype
Well all the work is completed in Burr Tools. I now have a fully working puzzle, and a proven assembly and disassembly. That's all very well, but the virtual world really doesn't let you know how a puzzle feels to work with, or to manipulate. So for that I needed to create a prototype.
There are a number of tools out there designed for the job. Livecube is one such tool, and given that all the blocks are perfectly square, it makes the job of creating a burr puzzle very easy. The drawback to Livecube is that it's not easily available, and if you want to be able to seriously test your design, or be able to hand it to someone that doesn't know the mechanism, then you need to glue the pieces together. In my mind that makes things a little more expensive that I'd like for a prototype, that I don't know if I'm going to like.
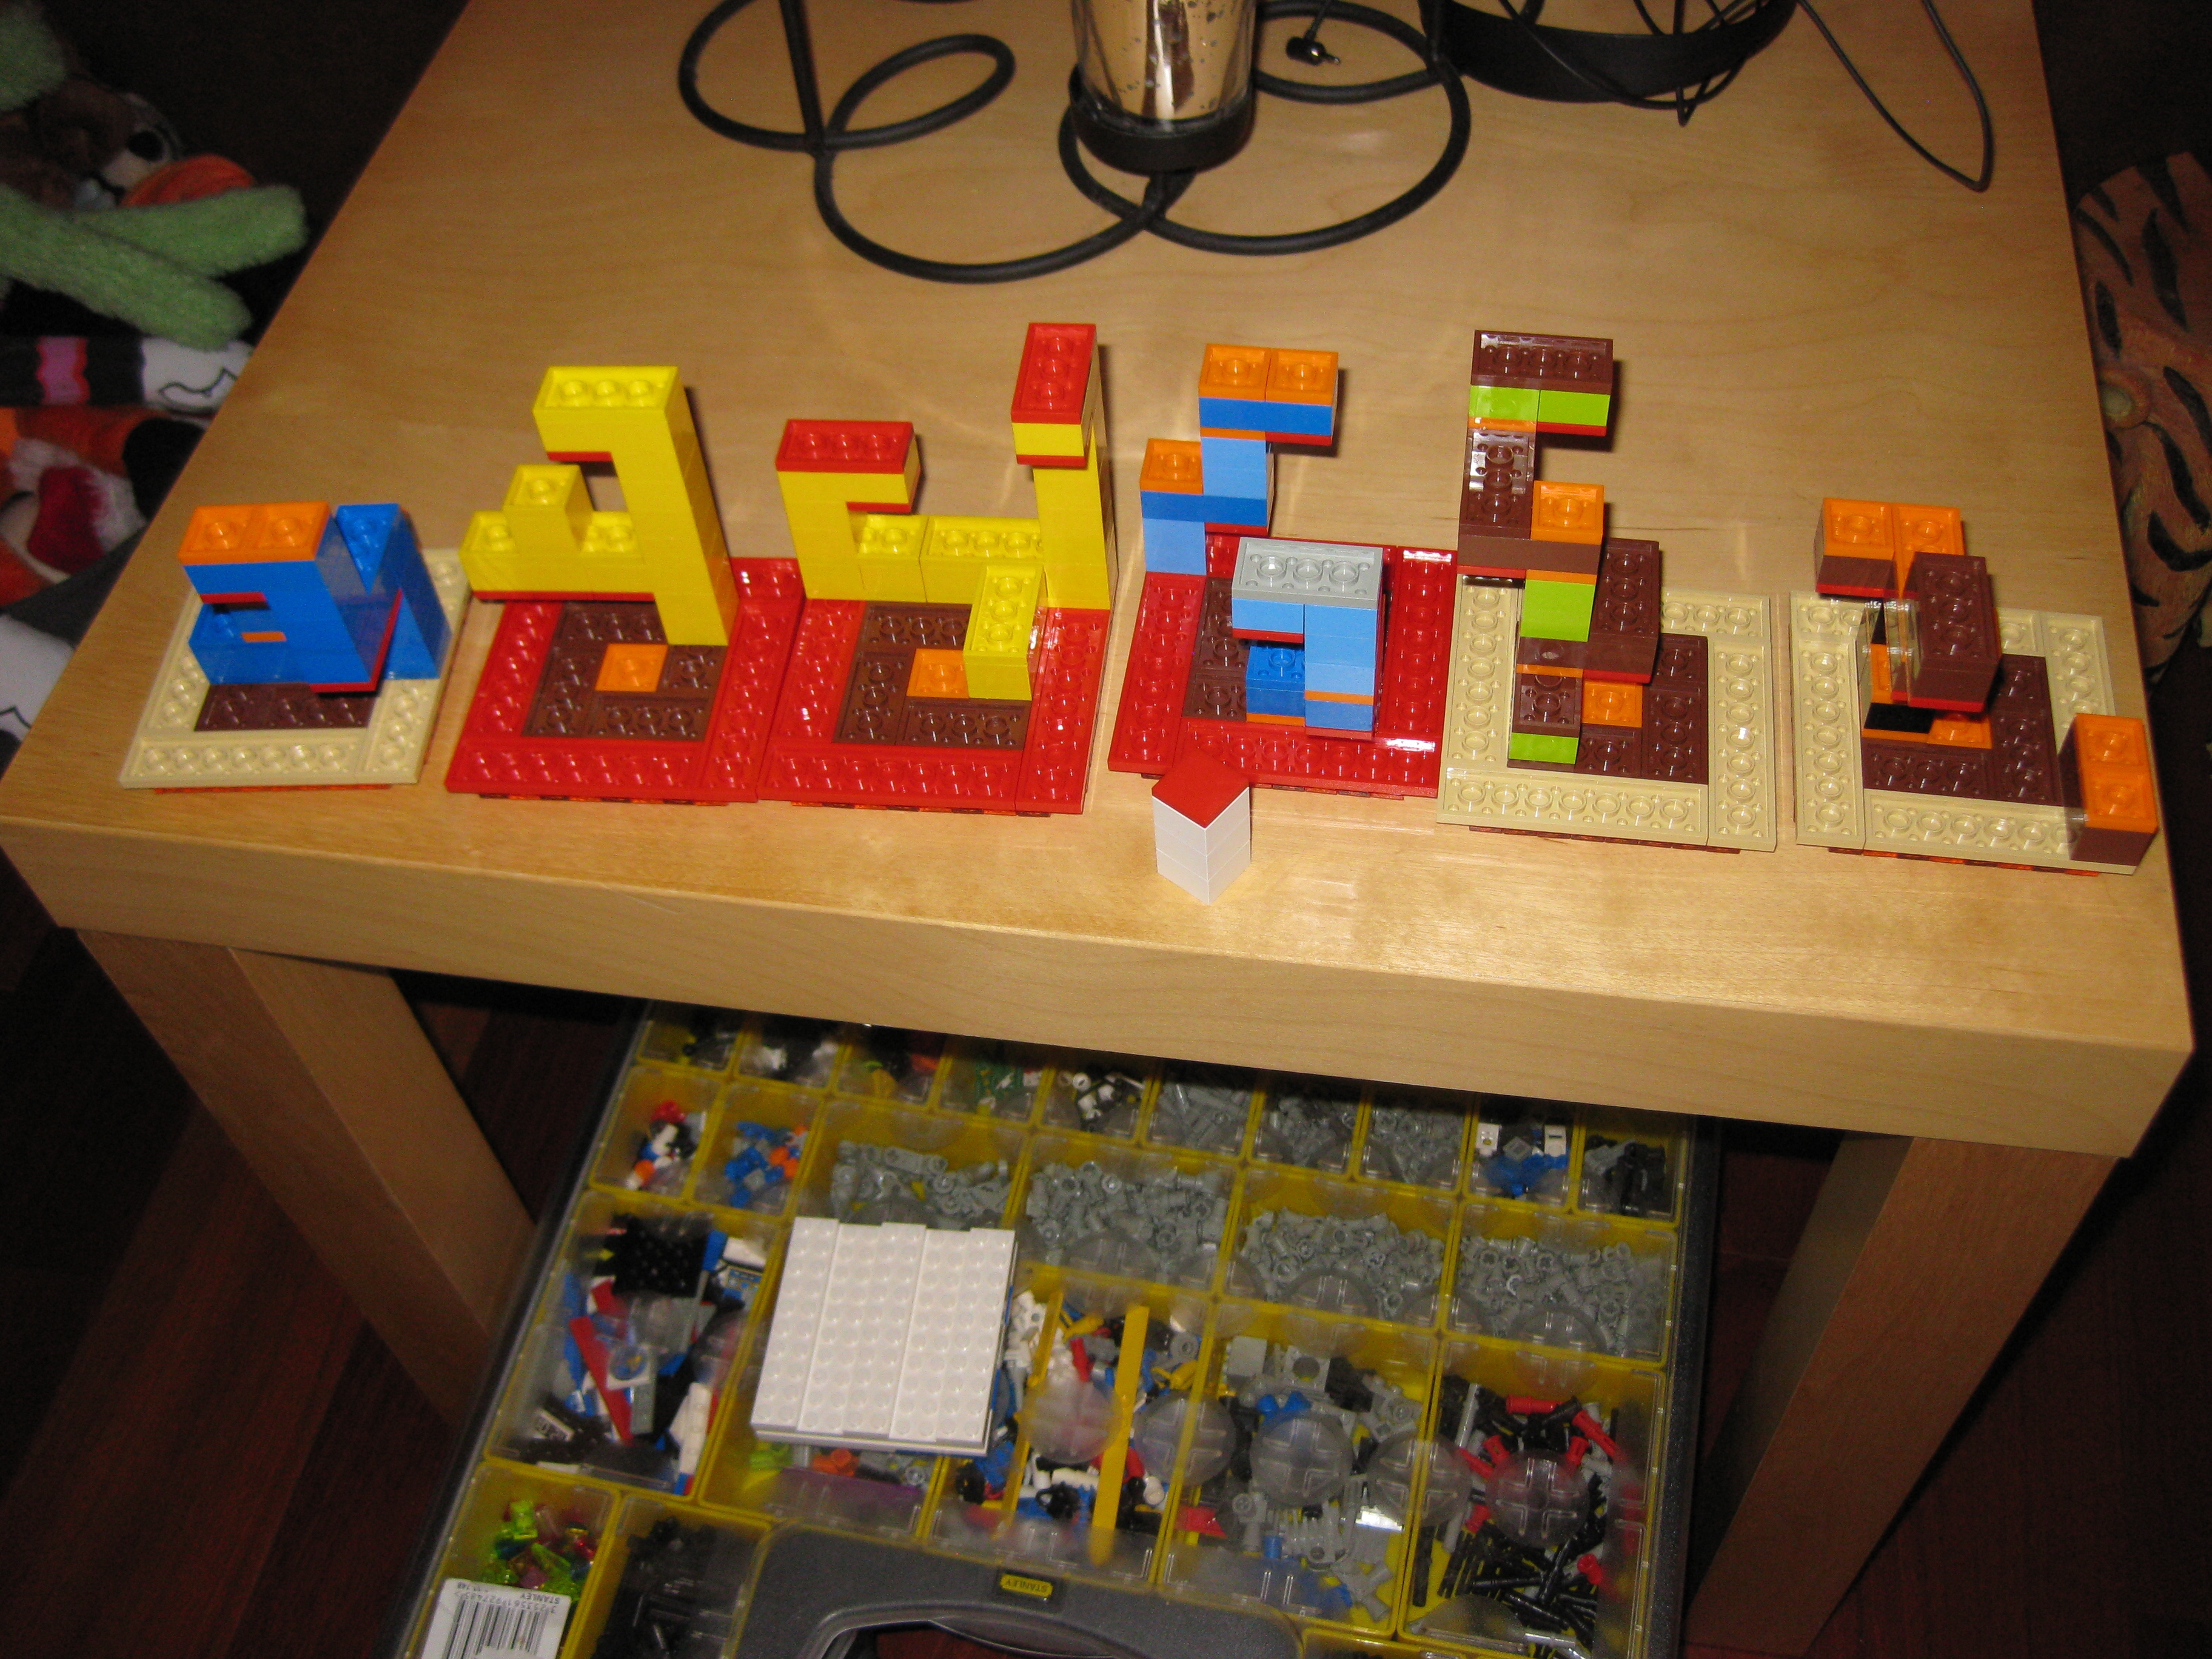
As it happens, I have a huge Lego collection. So I decided to use that. As anyone who is familiar with Lego will tell you, Lego bricks are not perfect cubes. It you take a 2x2 brick, and put it side on to another 2x2 you'll see that it's not as high as it is wide. Fortunately it's easily fixed as you can think of the brick as being 5 units wide by 3 units high. Each flat plate is 1 unit high, so one brick plus two plates gives you a cube.
With that in mind I started building the pieces using the model I created in Burr Tools as my reference.
About an hour later, I had all the pieces made, and it was time to sit down and solve the puzzle...
Friday, February 25, 2011
First Steps
As I mentioned in my previous post, I planned to discuss the steps I went through in creating my first puzzle. This is going to be a burr puzzle, with a twist. Rather than being able to see the pieces, they will be contained inside a cube. In reality, the walls of the cube will be attached to the pieces, so that the completed puzzle will form a cube rather than putting the pieces into a cube. Don't worry, it will make sense as I go!
The first of those steps was to get some sort of idea of how the puzzle would look, what the pieces were going to be, and to verify that it would actually work as a puzzle. I drew a few paper sketches and had the idea in my mind as to what I wanted. From there I was introduced to Burr Tools. Check out the links on the right for more on the tool. It's an excellent program and allowed me to create a virtual prototype of the puzzle, and verify that everything would would the way I intended it to.
Now, I'm not going to pretend that this is fool proof. You need to work with the program as it has some limitations, and you really need to understand the mechanics of your puzzle to be able to get the program to do what you need.
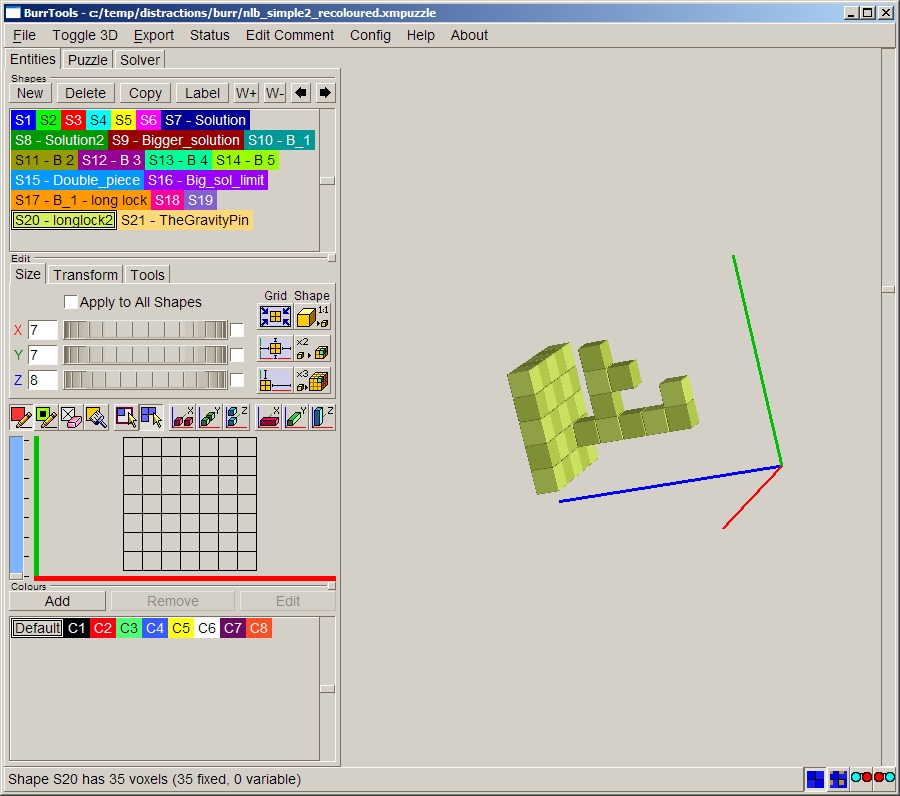
The image below shows just one of the sides that I created. As you can see, both the internals, and the external side are there, and the top left shows all the pieces I created. I spent a lot of time working with the program to make sure that the pieces held each other in place and didn't just fall out when the puzzle was assembled.
The one thing I wanted to do was have the final piece (in my original idea, that was the piece shown below) to work like a key, which you would turn once inserted which would lock the entire puzzle in place. Burr Tools doesn't have the facility to deal with rotations, however I could still use it to check this would work.
As it turns out,I didn't use this feature for the first version of the puzzle, as it is possible to build it without, and my prototyping material (Lego) doesn't make that rotation easy. In wood, I could curve the ends so that they would turn past each other, but without a lot of work that 's not possible in Lego.
I ended up with two distinct versions created in Burr Tools. The first was a non-rotation version, and the second followed my original plan and retains the turning key to finish.
With the virtual puzzle complete, next step was to make it into something I could handle and check how it worked. There are a number of tools out there to do that, and you can even export the shapes from Burr Tools and upload them to a site like shapeways for 3D Laser printing if you want. I'll talk more about that in the next post though.
For now, as you can see from the image above, Burr Tools gives you nice easy to follow cubed units to allow you to translate the design into whatever prototype you're going to make.
The first of those steps was to get some sort of idea of how the puzzle would look, what the pieces were going to be, and to verify that it would actually work as a puzzle. I drew a few paper sketches and had the idea in my mind as to what I wanted. From there I was introduced to Burr Tools. Check out the links on the right for more on the tool. It's an excellent program and allowed me to create a virtual prototype of the puzzle, and verify that everything would would the way I intended it to.
Now, I'm not going to pretend that this is fool proof. You need to work with the program as it has some limitations, and you really need to understand the mechanics of your puzzle to be able to get the program to do what you need.
The image below shows just one of the sides that I created. As you can see, both the internals, and the external side are there, and the top left shows all the pieces I created. I spent a lot of time working with the program to make sure that the pieces held each other in place and didn't just fall out when the puzzle was assembled.
The one thing I wanted to do was have the final piece (in my original idea, that was the piece shown below) to work like a key, which you would turn once inserted which would lock the entire puzzle in place. Burr Tools doesn't have the facility to deal with rotations, however I could still use it to check this would work.

As it turns out,I didn't use this feature for the first version of the puzzle, as it is possible to build it without, and my prototyping material (Lego) doesn't make that rotation easy. In wood, I could curve the ends so that they would turn past each other, but without a lot of work that 's not possible in Lego.
I ended up with two distinct versions created in Burr Tools. The first was a non-rotation version, and the second followed my original plan and retains the turning key to finish.
With the virtual puzzle complete, next step was to make it into something I could handle and check how it worked. There are a number of tools out there to do that, and you can even export the shapes from Burr Tools and upload them to a site like shapeways for 3D Laser printing if you want. I'll talk more about that in the next post though.
For now, as you can see from the image above, Burr Tools gives you nice easy to follow cubed units to allow you to translate the design into whatever prototype you're going to make.
Can I really create my own puzzles?
So I've been toying with the idea of creating a few puzzles of my own for some time now. I love Japanese puzzle boxes, and have a couple in my collection. I also love wooden puzzles, probably because I like the feeling of wood. There's something about the way wood feels when you work with it, and no two puzzles made from wood will ever be the same thanks to the grain and so on.
Anyway I digress. I'm not a wood worker, and have limited experience working with wood so I know that I have no chance currently at making any sort of worthwhile Japanese puzzle box. However I was asked just before Christmas to make a pencil case for my girlfriend. So I got some wood, dusted off the tools and got to it.
Now at this point I had virtually no power tools, so everything was done by hand. The wood was marked up, and sawn using a hand saw, I added dowels which I made just using a hand drill, and mitered the bottom to place the base in using my Dremel.
Ok, so why is all of this relevant? Well having completed this simple project, I realised that in fact I'm not all that bad at this, and maybe I can start doing something a little better. So what now?
One of my friends is also a puzzle designer, and I really like the things he's done. He creates burr puzzles, and variants of burrs, and that seemed like a sensible place to start. After all, in its simplest form, a burr puzzle is just lots of cubes stuck together. Well my friend pointed me to a great software program called 'Burr Tools'. It allows you to not only create the pieces for your puzzle, but it can also solve it for you. Well I wasn't interested in solving puzzles I owned, but in creating my own. I had an idea for a puzzle cube, where the burr would be internal and unseen and set about creating it.
The next few posts will follow the creation of that first puzzle from it's initial idea, through modelling in Burr Tools, to my first prototype and then hopefully the first finished version created in wood. Keep checking back to see the progress!
Just Getting Started
Welcome! I'm glad you've found me.
I've been a puzzler for over 20 years now, and have a reasonable number of puzzles in my collection. A few of my friends have been blogging about their puzzles for a while now and it seemed like a good idea. I thought I'd try to do something a little different though.
I've started designing and building my own puzzles, so I thought I'd try to blog about that as well as the puzzles I own. I know many people who think "Wouldn't it be cool to design my own puzzle", and hopefully be reading through my experiences you'll see that it's not that difficult, and there are many good tools out there to help!
If you enjoy it, or you're doing something similar yourself, then I'd love to hear from you!
Take it easy,
Neil
Subscribe to:
Comments (Atom)